Sample Code
HTCpro MDM Sample Code
The HTCpro MDM API includes a sample application that illustrates all the major functionality for managing access to the various components and uses the standard Android Device Admin enablement APIs.
Installing the MDM sample code: The sample project is already an Eclipse based project so you may simply import from within Eclipse. If working on a different environment make sure to target the OpenSense SDK Add-on. For both cases, the OpenSense SDK Add-on can be installed from the Android SDK Manager:
Please note: the HTCpro MDM APIs are only available starting with Sense 4.x devices. Sense 3.x ICS devices are not supported.
Here are the screenshots of the main activity screens of the sample application:
First Screen  |
Second Screen 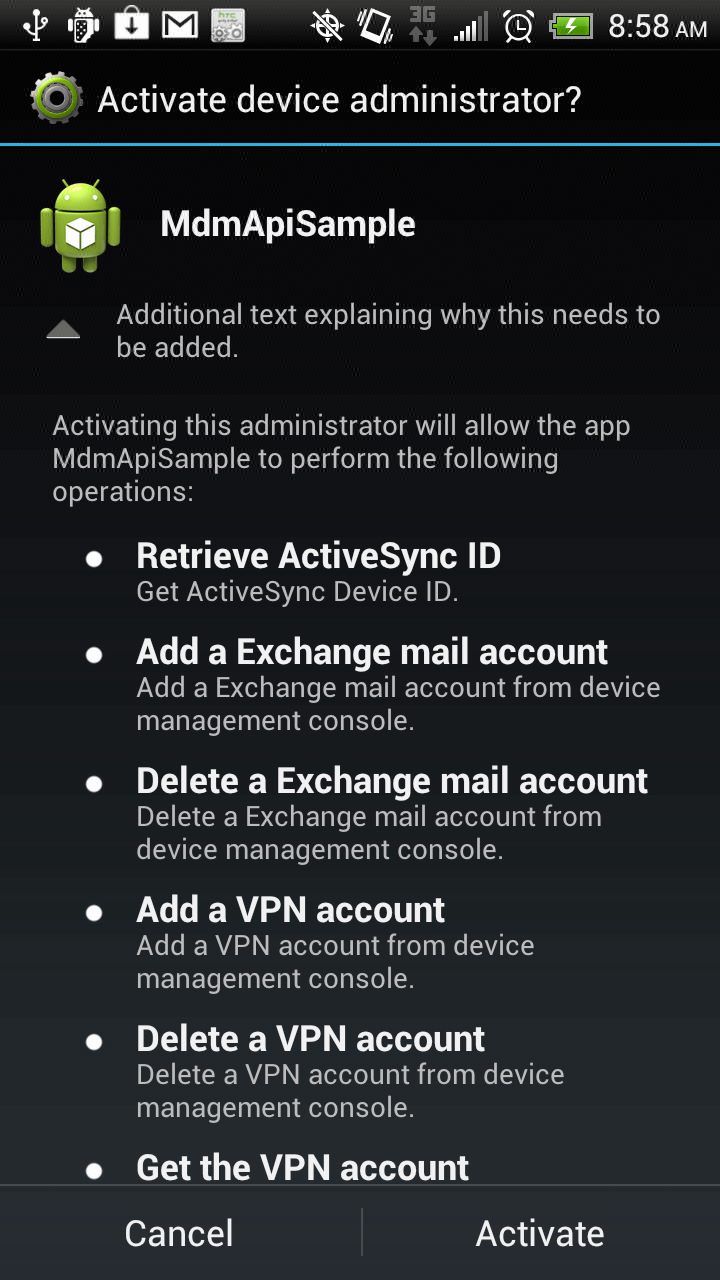
|
A requirement to access device admin APIs is to first activate Device Admin capability for this activity. The second screen is the standard window that appears when one presses the "Enable Admin" button on the main activity screen.
After activating Device Admin, you will be returned to the first screen where you will see the Enable Admin button toggle to Disable Admin (as shown).
Once activated, many of the items on the screen, buttons, check boxes and text fields will be enabled (otherwise the components are disabled).
Shown on this first screen is a form to fill for adding a new EAS account. Towards the bottom of this screen is the top of the VPN configuration form (the screen scrolls) where you can add or delete VPN adapters and get additional info.
Scrollng down on the main activity's initial screen, we can see the following:
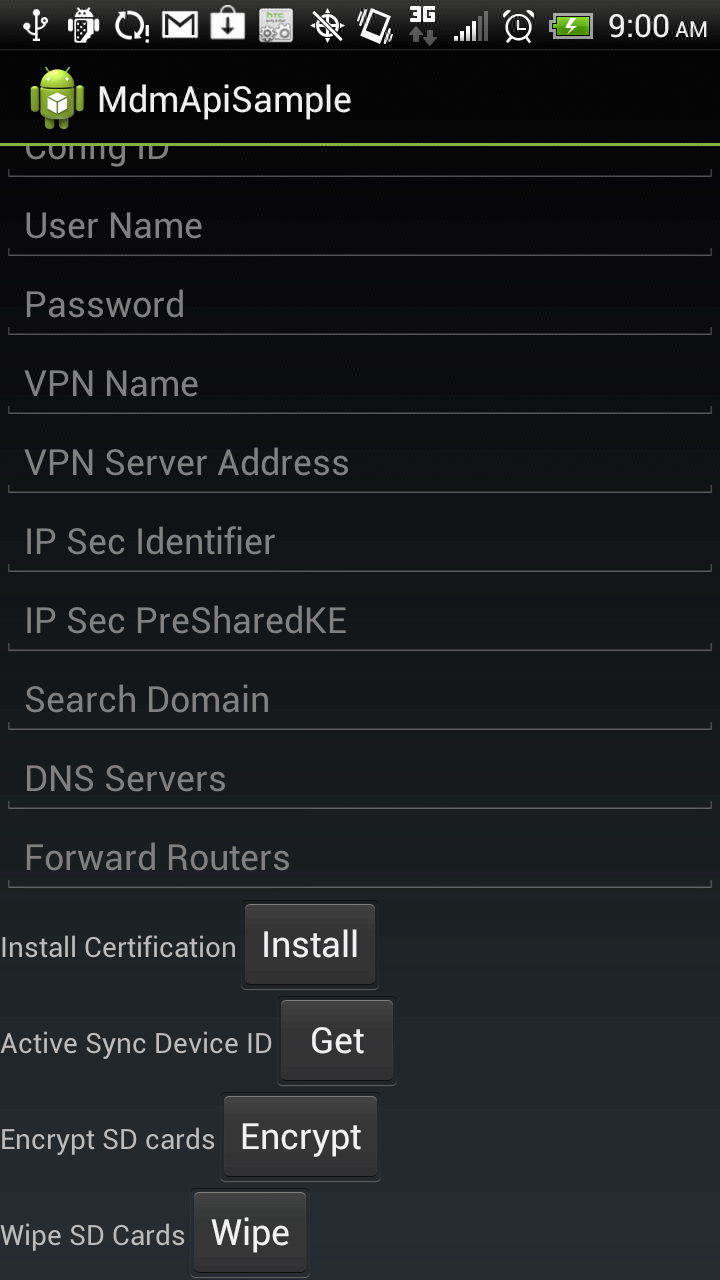
Following the bottom half of the VPN configration form, we find 4 additional features:
- Install Certification: it will search and filter certification files (primiarily based on file extension) for installation
- Get Active Sync ID: returns unique active sync ID
- Encrypt SD Cards: sets requirement for SD card. It can test if already encrypted (as of HTC SDK API Level 22 - see About HTC SDK API Levels within sample code below)
- Wipe SD Cards: can wipe SD card(s) which includes internal "SD card"
MDM Framework Overview
The following diagram provides an overview of the components involved:

The following calls out the API calls for each component as featured in the sample code:
| EAS add an EAS Account delete an EAS Account obtain ActiveSync device id |
VPN add VPN adapter delete VPN adapter obtain VPN adapter by configuration id |
| SD
Card wipe SD cards encrypt SD cards |
Additional install certificate |
Note: this is an initial set, future updates will add additional components and features or integrate with 3rd party solutions.
The following flow diagram illustrates the flow between the various components and standard Device Admin functionality:

Here is the code listing excerpt from MdmApiSample.java:
public class MdmApiSample extends Activity implements FileFilter {
    /** Called when the activity is first created. */
    private final static String TAG="MdmApiSample";
    static final int RESULT_ENABLE = 1;
    static final String ACTIVE_ADMIN = "com.htc.sample.mdm.ACTIVE_ADMIN";

    DevicePolicyManager mDPM;
    ComponentName mDeviceAdmin;
    Button btEnableAdmin;
    ArrayList<Button> mTestButtons = new ArrayList<Button>();

    BroadcastReceiver receiver = new BroadcastReceiver() {

        @Override public void onReceive( Context context, Intent intent ) {
            Log.d(TAG, new Exception("Debug Tracing").getStackTrace()[0].toString());
            DevicePolicyManager Dpm = getDPM();
            enableTestButtons(((DevicePolicyManager)Dpm).isAdminActive(mDeviceAdmin));
        }
    };
As show above, a broadcast reciever is used for recieving a notification that we're ready to create a device policy manager (more on that in a bit)
There are also additional broadcast receivers declared in our manifest:
<receiver android:name="com.htc.sample.mdm.ResultReceiver"
            android:permission="android.permission.BIND_DEVICE_ADMIN">
            <intent-filter>
                <action android:name="com.htc.app.admin.dpm.action.DPM_ERROR_STATUS" />
            </intent-filter>
        </receiver>

        <receiver android:name="com.htc.sample.mdm.DeviceAdmin" android:label="@string/app_name"
            android:permission="android.permission.BIND_DEVICE_ADMIN">
            <meta-data android:name="android.app.device_admin"
                android:resource="@xml/device_admin" />
            <intent-filter>
                <action android:name="android.app.action.DEVICE_ADMIN_ENABLED" />
            </intent-filter>
        </receiver>
As you'll notice the second receiver is defined in DeviceAdmin.java, the DeviceAdmin receiver (this whether we activated via our sample project or from device settings -> security:)
public class DeviceAdmin extends DeviceAdminReceiver {
    private static final String TAG="DeviceAdmin";
    void showToast(Context context, CharSequence msg) {
        Toast.makeText(context, msg, Toast.LENGTH_SHORT).show();
    }

    @Override public void onEnabled(Context context, Intent intent) {
        Log.d(TAG, new Exception("Debug Tracing").getStackTrace()[0].toString());
        Intent i = new Intent(MdmApiSample.ACTIVE_ADMIN);
        context.sendBroadcast(i);
        showToast(context, "Sample Device Admin: enabled");
    }
Additional call backs include:
onDisabled()
onDisableRequested()
onPasswordChanged()
onPasswordFailed()
onPasswordSucceeded()
Additional device admin management restrictions can be added here to handle number of failed password attempts for example.
The first receiver maps to ResultReceiver.java and as expected this handles all the results of the DM operations on the various components.
Let's follow one starting with the result for a request for an Active Sync ID:
@Override public void onReceive( Context context, Intent intent ) {
        Log.d(TAG, new Exception("Debug Tracing").getStackTrace()[0].toString());
        Log.v( TAG, " ResultReceiver.onReceive " );

        String intentString = intent.getAction();
        Log.v( TAG, "onReceive(), received intent:" + intentString );

        if ( intentString.equals(DpmErrorCode.ACTION_DPM_ERROR_STATUS) ) {

            // Check error code
            int resultCode = (int)intent.getIntExtra( DpmErrorCode.EXTRA_ERROR_CODE, -1 );
            Log.v( TAG, "resultCode:" + resultCode );

            showToast( context, " Code: " + resultCode );

            // Handle error codes accordingly. In this sample application we simply display a Toast to user
            switch( resultCode ) {
            // ************** Success ***************
            // Get Active Sync ID Success
                case DpmErrorCode.DPM_ERROR_GET_ACTIVE_SYNC_ID_SUCCESS :
                    String activeSyncId = intent.getStringExtra(DpmErrorCode.EXTRA_ACTIVE_SYNC_DEVICE_ID);
                    Log.v(TAG, "activeSyncId="+ activeSyncId);
                    showToast(context, "activeSyncId="+ activeSyncId);
                    break;
Remember, following the flow diagram above, after we're sure that the Device Admin is activated we need to obtain the request method from the device policy manager. For this specific case, this is initiated from the corresponding button in MdmApiDemo.java:
void testGetActiveSyncDeviceId() {
        Log.d(TAG, new Exception("Debug Tracing").getStackTrace()[0].toString());
        HtcIfDevicePolicyManager Dpm = (HtcIfDevicePolicyManager)getSystemService(Context.DEVICE_POLICY_SERVICE);
        Dpm.getActiveSyncDeviceId();
    }
Success and error codes are handled together as shown in the onReceive() snippet from ResultReceiver.java shown above.
Handling different MDM API versions About HTC SDK API Levels: You may find the following under Settings->About->Software Information: HTC SDK API Level 4.1x (or 4.2x depending on the device) There are several reasons for having several versions of the SDK API supported (note this versioning is not the same as Sense version). One reason is the capabilities of the device. Note that MDM is supported starting with API Level 4.11, but additions have been made to more recent versions, starting with 4.2x notably new error codes corresponding to SD card encryption. An addition to the sample code (bottom of ResultReceiver.java) to handle new codes in HTC SDK API Level 4.2x would be as follows: The JavaDoc API Reference Documentation of the MDM API contains standard JavaDoc style "Since" tags that will indicate when an API was addded (which API Level it was added in). Please take note of which corresponding APIs for a corresponding API Level for your application is supported being by your target device(s). |
API Documentation: