HTC Dual Lens SDK
HTC Dual Lens SDK Overview and Sample Code
HTC Dual Lens SDK Overview
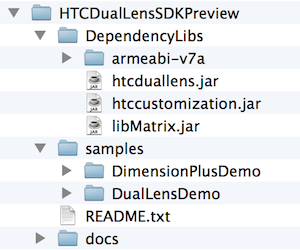 Once you've downloaded the Dual Lens SDK, HTCDualLensSDKPreview.zip you'll see the following contents: two sample code projects, library dependencies and JavaDoc API documentation.
As documented in the accompanying JavaDoc API docs, the APIs support the following two categories:
DualLens - support for obtaining and managing a “bokeh” strength map mask for requested strength values.
DimensionPlus - support for the DimensionPlus file format. Includes a DimensionPlusView class for rendering DimensionPlus photos and a DimensionPlusUtility class for exporting images in the DimensionPlus format.
HTC Dual Lens SDK Sample Code Projects:
The following two projects illustrate most of the APIs being made available at this time for this initial release. We will review the samples using code snippets from each to highlight the relevant APIs.
DimensionPlusDemo:
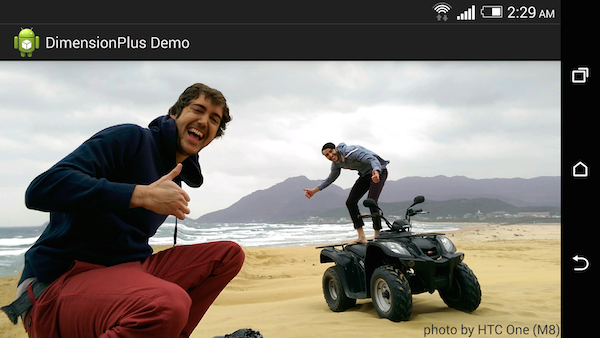
In this example we get to code the "3D-Dimension Plus" editing effect as seen on HTC One (M8)'s Camera and Gallery applications. In this case we're just demonstrating the tilting of the camera to view the "3D" effect. As an exercise for the reader you can also add touch gestures to experience the effect.
Here's the apk for this sample, DimensionPlusDemo.apk and in fact you can run this Dimension Plus photo viewer sample application on most Android devices! That's right, you can share the Dimension Plus experience with your friends and we encourage you to share this apk. Now this sample demo has a specific hard coded image path pointing to the root folder of the sdcard to view this specific image, DimensionPlusSample.jpg. So you'll need to copy this image over to see the effect. However you could replace the image with your own Dimension Plus photo taken with your HTC One (M8) and share the "3D" effect with others. Simply copy the image over when connected over usb or use
adb push dimensionPlusSample.jpg /sdcard/
Of course this is a primitive example, you could potentially have a more general viewer solution to view an album of photos or more easily select an existing Dimension Plus photo to view or share. And with the DimensionPlusUtility class, you can also extract the geometry and create your own customized viewer and renderer.
Now let's let look at some code:
    @Override
    protected void onCreate(Bundle savedInstanceState) {
        super.onCreate(savedInstanceState);
        setContentView(R.layout.activity_main);

        dimensionPlusView=(DimensionPlusView)findViewById(R.id.dimensionPlusView);
        try {
            dimensionPlusView.loadDimensionPlusFile(filepath);
        } catch (IOException e) {
                ....
        }
Above we get to see two things, first the use of a special GLSurfaceView that will provide the actual visual effect for you. Note that we also add a reference to the DimensionPlusView class in the layout xml resource file. Also shown is how to decode a Dimension Plus file for use in that View.
Next, let's look at how to pass the gyro sensor values into the view:
        private SensorEventListener mSenserEventListener = new SensorEventListener() {
        @Override
        public void onSensorChanged(SensorEvent event) {
            // gyro event
            float gravity1 = event.values[0];
            float gravity2 = event.values[1];

            int orientation = ((WindowManager)
                DimenstionPlusActivity.this.getSystemService(
                        Context.WINDOW_SERVICE)).getDefaultDisplay().getRotation();
            switch (orientation) {
            case Surface.ROTATION_0:
                dimensionPlusView.gyro(-gravity2, gravity1);
                break;
            case Surface.ROTATION_90:
                dimensionPlusView.gyro(-gravity1, -gravity2);
                break;
            case Surface.ROTATION_180:
                dimensionPlusView.gyro(gravity2, -gravity1);
                break;
            case Surface.ROTATION_270:
                dimensionPlusView.gyro(gravity1, gravity2);
                break;
            default:
                dimensionPlusView.gyro(-gravity2, gravity1);
                break;
            }
Some best practices to keep in mind: When finished with the DimensionPlusView, please use the provided release() method to clean up resources (e.g. in onDestroy() ). And since it extends GLSurfaceView, bear in mind to also call the corresponding onPause and onResume() methods on the DimensionPlusVew class.
And that's essentially all the code to this sample, creating custom Dimension Plus viewers is very straightforward by using the DimensionPlusView class. For more advanced usage we provide the ability to extract the geometry from the Dimension Plus image as well as to export as a Dimension Plus image by using the DimensionPlusUtility class. See the JavaDocs for the complete API.
DualLensDemo:
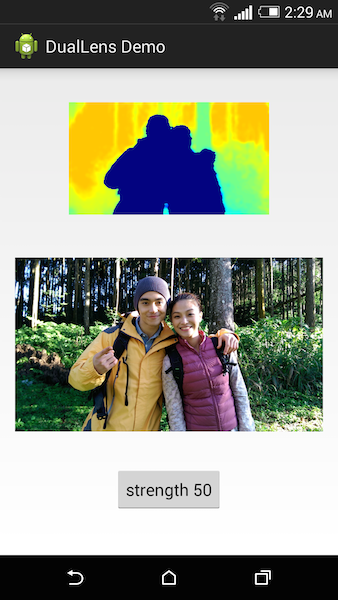
In this example we get to visualize captured depth information from a photo. This sample requires an HTC One (M8) with Sense 6.
Here we display the image accompanied by a color mapped representation of the calculated bokeh mask for a specific strength value. When you press the button you will be increasing the value by 10 from a range of 0-100.
Let's get right into some code:
public void onClick(View arg0) {
    if(mIsBokehReady) {
        mStrength+=10;
        if(mStrength>100) {
            mStrength = 0;
        }
        button.setText("strength "+mStrength);
        mIsBokehReady=false;
        mDualLens.setStrength(mStrength);
        try {
            mDualLens.calculateBokeh();
        } catch (...) {
             ....
        }
    }
}
Here's what happens when you click the button, we bump the value (wrapping around the range) and set the strength and calculate the bokeh mask. Results are managed via callbacks as follows:
mDualLens.setOnCompletionListener(new DualLens.OnCompletionListener() {
    @Override
    public void onCompletion(DualLens arg0, int event, int extra, String path) {
        switch(event){
            case Constants.TASK_COMPLETED_PREPARE:
                if(extra == 0) {
                    mIsBokehReady = false;
                    mDualLens.setStrength(mStrength);
                    try {
                        mDualLens.calculateBokeh();
                    } catch (...) {
                        ...
                    }
                }
                break;
                case Constants.TASK_COMPLETED_BOKEH:
                    mIsBokehReady = true;
                    drawMask();
                    break;
                }
            }
        });
Note that there's also a call back for the first time through - and that we need to initialize the engine in onResume() by using the DualLens prepare() method.
Cleanup should be done in the corresponding onPause() method using DualLen's release() method. Not shown here, but we also initialize a color map in onResume() by reading a color bitmap from assets.
And for reference here's how we visualize the data with a color map:
    private void drawMask() {
        DualLens.Holder buf = mDualLens.new Holder();
        DualLens.DataInfo datainfo = mDualLens.getStrengthMap(buf);
        int [] depthData = new int[datainfo.width * datainfo.height];
        int leftByte;
        for(int i = 0; i < datainfo.width * datainfo.height; i++) {
            leftByte = buf.value & 0x000000ff;
            depthData = mColorBar[leftByte*500];
        }
        Bitmap bmp = Bitmap.createBitmap( depthData,
                                          datainfo.width,
                                          datainfo.height,
                                          Config.ARGB_8888);
        image.setImageBitmap(bmp);
        image.setBackgroundColor(Color.WHITE);
    }