Android QuickGuides
- Getting Started with the Android SDK
- Building & Running Projects from the Command Line
- ADB Commands Quick Review Guide
- Common Emulator & Eclipse Shortcuts Guide
Getting Started with the Android™ SDK
Prerequisites:
- Download and install the JDK for Java SE 6 (already installed if on Mac OS X)
- Download and install the Android SDK
we will refer to the installation folder as <androidsdk> (Windows: Program Files\Android\android-sdk) - If developing in Eclipse: (note: this is optional for this tutorial)
- Download and install Eclipse 3.6 Helios: http://eclipse.org
- Download and install ADT Plugin for Eclipse
Add the Android SDK tools to your runtime path:
MacOS X and Linux:  add to your .bash_profile or equivalent:
            export PATH=$PATH:<androidsdk>/tools:<androidsdk>/platform-tools

Windows:  modify the PATH variable adding:  <androidsdk>\tools;<androidsdk>\platform-tools
            from either Control Panel -> System -> Advanced->Env Variables
            or My Computer - > Properties - >Advanced ->Edit Windows
Note: from here on we will be running android tools from the command line (open Command or Terminal window)
Complete installation of Android Platforms and Add-ons
Run from the command line> android
This will start the Android SDK and AVD Manager:
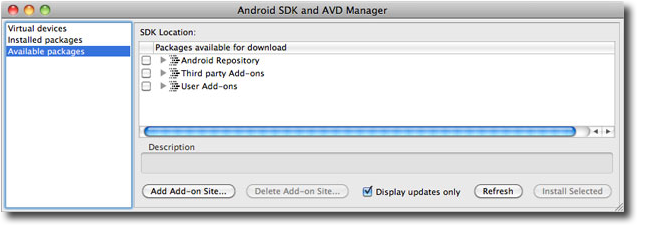
From Available Packages select at least the last two or three Android Platforms (e.g. API Level 10, API Level 11)
If you'll be using Google APIs like Google Maps, also get the Google Third Party Add-on for same API Levels
Create AVDs (Android Virtual Devices)
To run the emulator one must create AVDs specifying attributes and platform API level. From the Android SDK and AVD Manager: again select New...
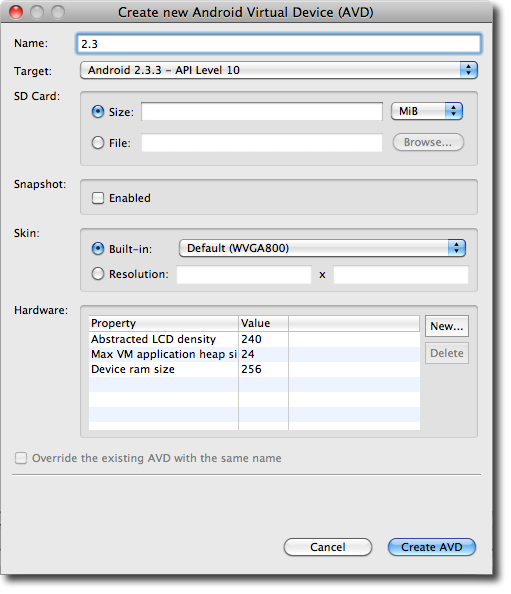
You give the new AVD any name but must select a target platform you've installed previously. Additional attributes are screen resolution, SD card size and whether you want to save snapshots of running instances of the emulator (to save time when restarting the emulator).
Once you have created several AVDs you will have a list as shown and you will be able to start the emulator for the selected AVD from Start...
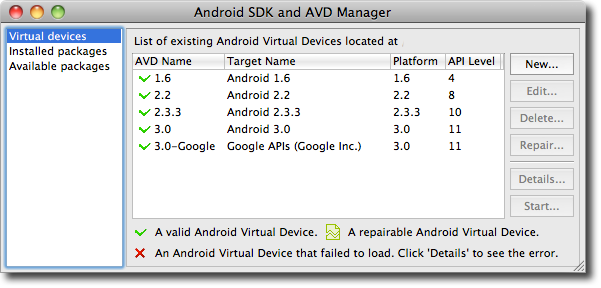
You should also be able to run from the emulator from the command line specifying an AVD you created by name:
emulator -avd 3.0
Building and Running Projects from the Command Line:
Prerequisite: install the Java ant build command (note already available on Mac OS and some Linux distros)
Download ant from http://ant.apache.org/bindownload.cgi and add <apache-ant-version>\bin to your run time path to run ant from the command line
Using the android command again you can either create a new project or update an existing one for building (one that already has a AndroidManifest.xml file).
For full options:
android -help
To create a new project: (this will create a new project in current directory path)
android create project -n myproject -k my.package -a MyActivity -t 11 -p .
To create build files for a current example code project (from within the current directory path -p . ):
android update project -p .
Now you can run the ant command from the current directory to build and run your application.
To create an .apk file for installing into devices simply type ant debug or ant release (release requires key for releasing app to market)
ant debug
This will compile your code and build an apk file in your bin subfolder - it will be named for example MyActivity-debug.apk but you can rename this file.
ant install
This will install your apk to a currently connected device (physical or virtual such as running emulator).
ant uninstall (uninstalls application from connected device)
Note: install and uninstall assumes one connected device. Use adb (below) to install/uninstall when more than one device is connected.
ADB (android debug bridge) Commands Quick Review Guide:
With the adb command you can communicate with connected android devices and emulators.
Note: Windows and Linux users may require USB drivers for certain devices.
To list all connected devices:
adb devices
List of devices attached
HT093H5031X5 device
if you have trouble seeing all the devices (especially avds) use the following command to kill the local adb server:
adb kill-server
and then run adb devices again to restart the local adb server:
adb devices
List of devices attached
HT093H5031X5 device
emulator-5554 device
emulator-5556 device
You can install apks to a currently connected device with the adb command:
(useful for devices that do not allow installing from an sd card)
adb install myapp.apk
If you have more than one device connected specify if it's a device or an emulator using -d or -e for example:
adb -d install myapp.apk
If you have more than one emulator or more than one device, specify the serial number:
adb -s HT093H503195 install myapp.apk
To uninstall an application you do not specify the apk file but the package name:
adb uninstall my.package.name
To view package name, permissions, and features that an apk uses:
aapt dump badging myapp.apk
To run an application using adb you must specify the activity you wish to start:
adb shell am start -a android.intent.action.MAIN -n my.package.name/my.package.name.MyActivity
To view the running log from the device:
adb logcat
you can subsequently save the logs to a local file:
adb logcat > out.txt
To copy files to and from a device use adb push and adb pull for example:
adb push myfile.zip /mnt/sdcard/update.zip
You can also boot into the bootloader (for installing new roms) using adb:
adb reboot-bootloader
Common Emulator and Eclipse Shortcuts Guide:
Useful Shortcut Keys: (replace cmd with ctrl on Windows and Linux)
Emulator:
esc - back key
ctrl-f12 - toggle landscape and portrait
cmd-option-enter - full screen
f2 - menu
Eclipse:
cmd-shift-L - all available shortcuts
cmd-shift-F - formats source
cmd-shift-O - organize imports
cmd-L - go to line number
cmd-1 - quick fix
control-space - content assist
cmd-shift-T - finds a class
cmd-T - shows hierarchy of class you've selected
option-shift-a - shows Android specific shortcuts